Pages

Thursday, August 12, 2010

Horizontal Centering

In Stone Age people used
element and align attribute to center elements on their pages... never use those. With the arrival of CSS the old methods have been deprecated as CSS is able to offer more flexibility and easier maintenance with regards to centering.
What is important to understand is that with CSS you don't just push the magic button and hope everything will work out for anything you want to center. You need to know what you want to center and what styles have been applied to that element in order to choose an appropriate method for centering.
In this tutorial I provide examples which demonstrate a particular centering method. Sometimes the effect may differ in Internet Explorer and standards compliant browsers. If you do not have Internet Explorer installed on your system you may want to use freely available tools such as NetRenderer or Total Validator.

Block-level and Inline-level Content

First step in centering with CSS is to find out what kind of element you are trying to center. Is it block-level or inline-level?
Different methods are used for each type of content. Plain text, images, , etc. are inline-level content, while elements such as
and

are block-level content. Using the display property, authors can change the way the element is displayed. For example, if you set img { display: block; } your images will not be affected by text-align property that affects only text and inline-level elements (unless you are talking about IE below 8 that is affected by Text-Align Bug).
Which elements are block-level and which are inline-level is beyond the scope of this document. There plenty of online resources available that describe everything in detail and I am not going to reinvent the wheel. Wikipedia has a list of inline-level elements as well as a list of block-level elements.

                                Lorem Ipsum Lorem Ipsum
                                Lorem Ipsum Lorem Ipsum
                                Lorem Ipsum Lorem Ipsum
                                Lorem Ipsum Lorem Ipsum
                                Lorem Ipsum Lorem Ipsum
                                Lorem Ipsum<br>
                                <img src="smiley.png"
                                        alt="Lorem Ipsum"  width="35" height="35">

                        </p>
                </div>
        </div>
        <div class="outer2">
                <div class="inner">

                        <p>
                                Lorem Ipsum!
                                Lorem Ipsum!<br>
                                <img src="smiley.png"
                                        alt="Lorem Ipsum"  width="35" height="35">

                        </p>
                </div>
        </div>
</div>
CSS code
#container
{
        height: 200px;
        position: relative;
        overflow: hidden;
}
        .outer, .outer2

        {
                position: absolute;
                top: 0;
                width: 200%;
                left: -50%;
        }
        .outer2 { top: 85px; }
                .inner

                {
                        position: absolute;
                        left: 50%;
                }
                        .inner p
                        {
                                position: relative;
                                left: -50%;
                        }
                        .outer2 p

                        {
                                background: #afa;
                        }
condcom code
The method is extremely similar to method of centering floats. However, there may seem to be some redundant or unexpected code, .outer, .outer2 { width: 200%; } in particular.
First of all it's important to understand the difference on how left and right properties affect absolutely and relatively positioned elements.
When position property is set to value relative, code left: 50% will offset the entire element by 50% of the width of the parent container. However, when the position property is set to absolute and width is set to auto (the default width value), left: 50% will move the left margin edge of the element by 50% of the width of the container, i.e. resizing the element.
So what problem does it create to us? If we would to try to center our absolutely positioned element the same way we centered floats subsequently changing position: relative to position: absolute, our "shrink-wrapped" element would be able to expand only up to the half of its parent. If that's good enough for you, you can avoid the second wrapper
in the example above.
With obstacles addressed, let's begin breaking down the code and looking at what it does. Once again, #container { position: relative; } establishes containing block for our absolutely positioned elements. However, note the #container { overflow: hidden; } it not there to contain any floats as one may think at first. It does exactly that, hides any overflow. Where is that overflow coming from? Take a guess, it's from .outer, .outer2 { width: 200%; } that makes .outer and .outer2 twice as wide as the parent, but #container { overflow: hidden; } hides that extra half of width.
Now, let's follow the "tree" of our left property values on all those container and see each step's purpose.
Along with doubled width, our .outer also has left: -50%; (note the minus sign). Since we did define width, left moves the entire element to the right (because we have used a negative value for left), half the parent's width. Now the horizontal middle of .outer is in the center of #container with 25% of .outer's width (remember, we doubled the width) sticking out of the #container on each side. If you don't understand why 25% on each side, let me follow again on our dimensions. .outer's width is double the parent's width, left: -50% moved .outer half of the parent's width which is exactly 25% of .outer's width. Since originally .outer's left edge was at the left edge of the #container and we moved it 25% of .outer's width the other 25% of .outer's width will end up sticking out on the other side of #container. What we basically did is create a centered container that is double the width of the #container and if you were following the above paragraphs you know why we wanted this - our shrink wrapped element will expand only half the width of that parent, but since we have just doubled the width of the parent, the shrink wrapped element will be able to expand up to 100% of the #container.
Next step is absolutely positioned .inner with left: 50% on it (note that this time it is a positive value). Since .inner does not have any width set (i.e. has width: auto since that's the default), left: 50% moves the left margin edge of .inner to the center of .outer consequently allowing the shrink-wrapped contents of .inner to expand only up to the half of .outer's width, but since we have doubled .outer's width, this effect is exactly what we want.
Final step is the actual element that we were trying to center in the first place, is our .inner p. Note that it is relatively positioned (i.e. has position: relative) and the reason is that we want left: -50% (negative value again) to offset the element itself instead of only its margin edge. Now .inner's left margin edge is in the center of .outer (and of course the center of #container) as well as .inner is shrink wrapped around our
, thus
's left margin edge is in the center of #container. Offsetting
by half the .inner's width is the same thing as offsetting it by the half of its own width that will perfectly center it inside #container, which is what we wanted.

Special Note On Images and Content With Intrinsic Dimensions

I often see people being hard on themselves, trying to center some design related image using element. First of all, you should use element only for content level imagery such as photographs, charts and maps, basically images which would not be changed if the website would be redesigned. For presentation level imagery such as borders, pretty design elements, rounded thingies etc. you should use the background property.
However, if your image is content level, and you are trying to center it, there is a trick. Images have intrinsic dimensions, meaning that browser knows image's height and width without you explicitly telling about it. Referring back to our centering block-level content with known width section we know that margin: 0 auto will center an element providing you have set width. Since elements with intrinsic dimensions already have that width, specifying just margin: 0 auto will successfully center them.
"Wait a second", one may say, "images are inline-level content, margin: 0 auto will not center them". That's where the display property joins the game. Setting display: block on our element makes it act like a block-level element.

Example 7

Your browser must render images and support CSS in order to view this example.
Lorem Ipsum
Lorem Ipsum design
HTML Code
<div>
        <p>Lorem Ipsum</p>
        
        Lorem Ipsum
        <img src="design.jpg" width="100" height="80" alt="design">

</div>
CSS code
div { text-align: left; }
        p

        {
                width: 80%;
                margin: 30px auto;
                background: #fff url(design.jpg) no-repeat center;
                color: #000;
        }
        
        img

        {
                display: block;
                margin: 0 auto;
        }
The example shows two methods that I've just mentioned. First, note that I've set div { text-align: left; }. I did it only to assure you that we have not set text-align: center anywhere since that's not how we are doing the centering in this example.
Take a close look at our
. The image is there. The image is centered. However, it is cut off. Yes, setting background does not affect the size of the element in any way, neither can you stretch or set dimensions on background images. The actual centering is done by the center word in the value of background property, which is a shorthand. The effect would be the same if we would have used background-position: center center. The values that background-position property accepts is beyond the scope of this tutorial.
Now let's take a look at our element and the text that is directly inside the
. I want to note that having plain text inside the
is not semantic, however I did not want to make my example too complicated. The is centered, text is not. What's the magic? It's right there, img { display: block; margin: 0 auto; }. As I've mentioned earlier, img { display: block; } makes our image act like a block-level element. Since is an element with intrinsic dimensions, setting img { margin: 0 auto; } centers it, despite the fact that we haven't set width on the image.

Internet Explorer Bugs

There are two modes in IE: standards compliant mode (buggy) and quirks mode (super buggy). The modes are switched with the DOCTYPE which is known as Doctype Switching.
When Internet Explorer is in quirks mode, it does not center block-level elements with margin: 0 auto. So how would you center it? First of all, you should not have your IE in quirks mode. I understand that under some circumstances changing the DOCTYPE could be impossible. However, there is another bug in Internet Explorer, which can be used to center block-level elements in quirks mode. Let's take a look at the example and I will explain what is going on.

Example 8

I am not affected
Lorem Ipsum!
Lorem Ipsum
HTML Code
<div>
        <p id="fixed">I am not affected</p>

        <p id="broken">
                Lorem Ipsum!<br>
                <img src="smiley.png" alt="Lorem Ipsum"

                                width="35" height="35">
        </p>
</div>
CSS code
div { text-align: center; }
        p
        {
                margin: 1%;
                width: 20%;
        }
        #fixed { float: left; }
        #broken { clear: left; }
In the example there are two paragraphs, one is #fixed another one is #broken. The
has text-align: center applied to it which, in standards compliant browsers does not center our block-level s. Take a look in Internet Explorer however. What is going on? Apparently #broken is centered with respect to the
it is contained in. But what's the difference between #fixed and #broken? The float. In IE, text-align affects block-level elements as is mentioned in my Text-Align Bug, it does so in both, standards compliant and quirks mode. It seems that the only way to fix that effect is to apply float: left or float: right; to the affected element.
As I have mentioned before, the expanding box model bug messes up virtually every centering method I have covered. It is out of scope of this tutorial, and I haven't found any usable solution for it. I will do more research on it, and hopefully will write a tutorial on how to fix it which will be hosted on hasLayout.net.

Wednesday, August 11, 2010

Guess what? Web design in Chennai , India - We make it happen!

Do you agree the fact that your Website design is a reflection of your business?
Do you need a web page design that portraits your business strategy?
If so, you are at the right place to find the leader in web design!
Welcome to Ultimate creators India, Web Design Company. It is the Best Web Design Company India, situated in web design company Chennai, the emerging IT city, offers affordable Web design solutions to the customers all over the world.
Outsource Web Design Company India, Chennai

Visuals India is a Leading Global IT provider web design & web development company chennai which is specialized in web design & Web development, Branding designing, Graphics Designing, Customized web applications, software development, SEO Services, Search Engine Marketing, Web hosting, Website maintenance, Multimedia Solutions and much more.

Our Web Design India, Chennai team have a huge experience of corporate association in website designing, Web development, SEO Company Chennai fields and have serviced a very high and real understanding of client needs in USA, UK, London, Canada, Europe, Singapore and MiddleEast in field of web design, Web Development, SEO which enable us to extend your true brand and identity by offering the web design Company, Graphic Web Design, Website maintenance and SEO Services India.

Outsourcing Web Design Company India
Offshore outsourcing Web Designing and Development Company in India is one of the most popular management practices today. Visuals India an India based Offshore Outsourcing Website Designing Company situated in Web Design Company Chennai is the custom offshore outsourcing company with professionalism in web designing and web application development. We provide offshore website designing & web application development services to global IT clients.

Sunday, August 1, 2010

404 Errors: Report, monetize and analyse

After your websites getting more pages and links, the chance that a visitor will follow a dead link to your site exists. If a visitor is trying to access a page on your site, the server will report (normally) a 404 error. The response is by default some unfriendly page with some spare information about the error which let most visitors stop visiting your site. But using the 404 error the right way, you the site owner can collect important information like:
  • Of course the broken link or URL
  • The HTTP_REFERER information where the dead link is available
  • How often people try to access the bad URL
Using the right tools you’re able to turn 404 errors into a powerful resource:
  • Provide a site search feature and let people search what they are looking
  • Add advertisements to your error page and start earning money
  • Learn about what people like to see on your site
In this tutorial we will show you how-to:
  • Create a dynamic error page using the Google Site search and Adsense content ads
  • Setup Google analytics to track 404 errors using a filter
  • Set the site search feature with Google Analytics to collect the search queries from your visitor

Error reporting page

With the Apache webserver it’s possible to use custom directives for your error script, place this code into your .htaccess file (place the file into the site root):

ErrorDocument 400 /error.php?err=400
ErrorDocument 401 /error.php?err=401
ErrorDocument 403 /error.php?err=403
ErrorDocument 404 /error.php?err=404
ErrorDocument 500 /error.php?err=500

We use for the custom error script the most common HTTP errors.
Next we need to create a PHP script called error.php which can handle the different errors:

$errorNum = (int)$_GET['err'];
$err_str = array(404=>'Not Found', 400=>'Bad Request', 401=>'Unauthorized', 403=>'Forbidden', 500=>'Internal Server Error');
echo '


'</span><span style="color: rgb(51, 153, 51);">.</span><span style="color: rgb(0, 0, 136);">$err_str</span><span style="color: rgb(0, 153, 0);">[</span><span style="color: rgb(0, 0, 136);">$errorNum</span><span style="color: rgb(0, 153, 0);">]</span><span style="color: rgb(51, 153, 51);">.</span><span style="color: rgb(0, 0, 255);">'


An error occured: '.$err_str[$errorNum].'

    '; ?>
This script will show the different errors and also some advertisement if you add the ad code. Don’t forget to add the GA code snippet.

Track dead links in Google Analytics

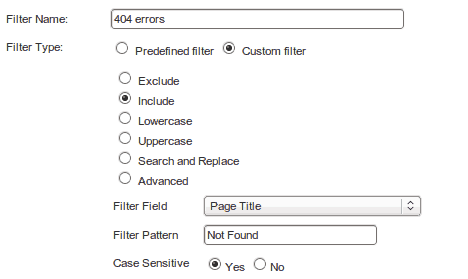
In case of a 404 error the page title on this custom error page will be “Not Found”. We use the page title as a filter in Google Analytics to track the page views. Create a new profile for the site you’re working on and add this filter:

Adding Google Site Search to your 404 error page

If you haven’t done yet, create a Google site search for your website. Add only your own website to the list of searched sites and don’t search the entire web. Add your Google Adsense ID (section “Make Money”) and head to the section “Look and feel” and select the option Iframe. Choose a style for the search form / result and maybe you like to customize the style. Push now the button “Get code” (or enter the section “Get code” from the sidebar) and enter there the URL from your error page.
Copy / paste the code for the search form and the results into the body section from your error page. Your completed page will look like:

$errorNum = (int)$_GET['err'];
$err_str = array(404=>'Not Found', 400=>'Bad Request', 401=>'Unauthorized', 403=>'Forbidden', 500=>'Internal Server Error');
echo '


'</span><span style="color: rgb(51, 153, 51);">.</span><span style="color: rgb(0, 0, 136);">$err_str</span><span style="color: rgb(0, 153, 0);">[</span><span style="color: rgb(0, 0, 136);">$errorNum</span><span style="color: rgb(0, 153, 0);">]</span><span style="color: rgb(51, 153, 51);">.</span><span style="color: rgb(0, 0, 255);">'


An error occured: '.$err_str[$errorNum].'

   
';   if (empty($_GET['q'])) { // show the ad only if there is no search echo ' '; } echo ' '; ?>
We placed the add code also into some IF clause, because there should not be another Google Adsense advertisement beside the Google ads from the result page.

Enable site search tracking in Google Analytics

The code for the error page is complete and we move to the last step: Tracking the site search queries from the error page. To do this we need to go in Google Analytics to the profile we created for the error page and click Edit (twice), check the setting Do Track Site Search, enter a “q” as the “Query Parameter” and click Safe Changes.
This error page is very basic and you need add your sites web template to make it complete. If you like this tutorial and you have used the code on your own site please share the URL to your new or updated error page. Even if you don’t like to use the code from this page, we advice to track the errors and also the site search queries from your visitors. If you have questions or comments please post them below.

PayPal Payment Tools: Information and Resources

f you’re looking for a trustful online payment solution, you will always notice PayPal as a well known payment platform. PayPal is a full featured payment solution provider for the (paying) user and for the merchant. This article is about why people should use Paypal and some tools which makes it easier to use this payment provider.

Why should you pay using PayPal?

PayPalEven if you don’t have a PayPal account, you should process your credit card payment via the PayPal platform. This makes sense if you don’t know/trust the payment provider from the merchant where you want to buy something. What if this merchant doesn’t offer the PayPal option on his website? In most cases companies having a Paypal account, just ask the merchant, if he want to make a sale, he will offer this payment method as well.
PayPal is also great if you don’t like to show a merchant your credit card details. In several countries it’s possible to pay by PayPal in real-time even if you need to fund your account from your bank account. PayPal is also some kind of online wallet, for example if you sell something on eBay and you get paid via PayPal. Just keep that money in your account and use it for later purchases. If you buy something on eBay and you pay via PayPal, you get some buyer protection. If the seller doesn’t send you the goods your paid for and he can’t proof the successful shipment, Paypal will refund your money.

PayPal features for merchants

As a shop holder you should always offer PayPal payments. Using PayPal as payment option on your e-commerce site enables additional payment methods: MasterCard, VISA and many other cards (depends on the buyer’s country). Since the funding methods are different for different countries, PayPal payments are the solution to offer many payment options. Some PayPal payment options for your website are:
  • Website Payments Standard – Add credit card processing to your site in about 15 minutes.
    Use this option if you don’t like to pay a monthly fee and if your PayPal check-out process must be simple and hosted on the PayPal website. Costs per transaction are low from 2.2% + $0.30.
  • Website Payments Pro – An Internet merchant account and gateway in one.
    This service is similar to the products from most other payment providers and the costs are a monthly fee of $30 and the price for each transaction starts from 2.2% + $0.30.
  • Payflow Payment Gateway – Process payments using your own Internet merchant account.
    A solution to use PayPal’s payment gateway (including PayPal payments). Note, the whole payment is processed on the PayPal site.
For all these payment options is an API system available.

Selected PayPal tools and services

Most of the PayPal features require some setup or you need to add some code (or button) on your website. What if you just need to send a payment request to someone (without knowing his PayPal address or you need just a link that someone can pay you with his credit card? For Microsoft Outlook users is on the PayPal website a plugin available which acts like a kind of wizard that creates the button code you can place into your email.
This wizard is a nice solution, but this button might be a problem if the html code gives the e-mail message a higher SPAM ranking.
SIMPAY offers functions where the PayPal payment request is created on-site in a pre-defined form and where the user can send a unique link via e-mail or an instant message system. It’s also possible to e-mail a payment request for recurring payments.
Another great service is FundRazr, they created, together with PayPal, a Facebook application which enables the user to setup a gadget that shows the “charity” and all related information. Other Facebook members will see the gadget on the wall from the fund raiser and are able to send him money via PayPal or they share the gadget on their own wall.

Slideshow Script – TinySlider

Slideshow Script
This super lightweight (1.5KB) and standalone sliding slideshow script can easily be customized to integrate with any website through CSS. You can add any content to it, not just images, and it gracefully degrades without JavaScript support. The script supports automatic rotation with the option to auto-resume, an active class on a navigation list if applicable, and a direction toggle (vertical or horizontal).
To initialize the script use the following:
1var slideshow=new TINY.slider.slide('slideshow',{
2    id:'slider', // ID of the parent slideshow div
3    auto:3, // Seconds to auto-advance, defaults to disabled
4    resume:true, // Resume auto after interrupted, defaults to false
5    vertical:false, // Direction, defaults to false
6    navid:'pagination', // Optional ID of direct navigation UL
7    activeclass:'current', // Class to set on the current LI
8    position:0 // Initial slide position, defaulting to index 0
9});
The first parameter taken by TINY.slider.slide is the variable name used for the object instance. You can also optionally set width and height parameters for the applicable direction you are sliding. If it is not set the width or height will be automatically calculated using the offsetWidth/offsetHeight of the first list element. This script has been tested in all major browsers and is available free of charge for both personal or commercial projects under the creative commons license. Community support is available here. Paid support is also available, contact me for details.

Monday, July 26, 2010

20 Steps to a Flexible and Secure WordPress Installation

A comprehensive WordPress installation, albeit simple to produce, often requires multiple steps — many of which can easily be omitted accidentally. How many times have you forgotten to customize your permalink structure? How about adding in a sitemap plugin? What about changing your timezone? If you’ve installed WordPress more than once, chances are you’ve missed something. Take the following steps and you’ll never miss anything again.

Step 1: Get WordPress from SVN

The number one mistake for a flexible WordPress installation happens right from the get-go. I’ve seen numerous developers manually download, unzip, and upload WordPress to their site. This is not only a waste of time, but it also reduces flexibility.
If you download WordPress from SVN, all you need to do is run the following in command-line:
  1. svn co http://core.svn.wordpress.org/tags/3.0 .  
Maybe you want the latest developer version. That’s even simpler:
  1. svn co http://core.svn.wordpress.org/trunk/ .  
Why is this so useful? For starters, all it takes is one command. Looking at WordPress in a long-term perspective reveals that SVN also provides the simplest, hassle-free way to update to a new stable version (or even downgrade). For example, let’s say you want to update to version 3.0. All you need to do is run the SVN switch command:
  1. svn sw http://core.svn.wordpress.org/tags/3.0/ .  
How easy was that? Note that if you’re using the developer version, updating is even easier:
  1. svn up  
That’s all it takes. If you ever need the URL to a new stable version repository, visit the WordPress Codex. You can also find full instructions on using SVN there.
“Looking at WordPress in a long-term perspective reveals that SVN also provides the simplest, hassle-free way to update to a new stable version (or even downgrade).”

Step 2: Secure .svn Directories

Directory
Now that you’re using SVN, you must ensure that your .svn directories are protected from the public. One main reason lies in the .svn/entries file, which can give out sensitive information to attackers. For further information regarding this subject, please take a look at Smashing Magazine’s article on the SVN server admin issue.
To secure .svn directories using .htaccess, just apply the following redirect rule:
  1. RewriteRule ^(.*/)?\.svn/ - [F,L]  

Step 3: Create wp-config.php

As outlined in the famous 5-minute WordPress installation, you’ll need to rename wp-config-sample.php to wp-config.php and add in your database information.

Step 4: Add a Unique Database Prefix and Authentication Keys

Keys
Leaving your wp-config.php file only with database information and no other configuration is a security issue. Make sure to generate authentication keys, as outlined in the comments. To do so, visit https://api.wordpress.org/secret-key/1.1/salt/ and copy-paste the randomly-created keys into the file.
Note that you should also change the default WordPress database table prefix. This is to secure your installation against hacks, such as the recent outbreak of the Pharma Hack. Visit random.org to generate a random prefix string which you’ll need to set as the $table_prefix in wp-config.php. In addition, make sure to add an underscore at the end of the prefix.

Step 5: Install Using wp-admin/install.php

As usual, visit wp-admin/install.php in your browser and follow the instructions. When filling out the form, change the default administrator username (“admin”) in order to increase security. Note that most attackers will target a WordPress installation with default settings. Thus, changing this username is a must.
“Note that most attackers will target a WordPress installation with default settings.”

Step 6: Remove wp-admin/install.php

This is a commonly-omitted step which only takes a few seconds to execute. Simply remove the wp-admin/install.php script after installing WordPress for further security.

Step 7: Login to the Dashboard and Complete User Profile

Login to your WordPress installation at http://example.com/wp-admin, click your username in the top-right corner, and fill out your user profile.

Step 8: Edit Tagline and Timezone

Timezone
Under the Settings > General tab, make sure to edit your blog’s timeline as well as timezone.

Step 9: Review Writing, Reading, and Discussion Settings

Although you might not have to change anything, looking over Settings > Writing, Settings > Reading, and Settings > Discussion is always a good idea. Ensure that the configuration meets your standards.

Step 10: Change Permalink Structure

Permalink
A default WordPress installation comes with query-string permalinks that look like http://example.com/?p=1 for each article. Not only is this not search-engine friendly, but it’s also not even human-friendly. Change this to a permalink structure that contains the title of the post (%postname% if you’re using a custom configuration).

Step 11: Add .htaccess Rules

An .htaccess file is necessary for your WordPress site to function correctly. To begin, turn on the RewriteEngine:
  1. RewriteEngine On  
Disable directory listings for security purposes:
  1. Options -Indexes  
Add/Remove www to prevent content duplication (replace example.com with your domain):
  1. # Add www (change www.example.com to example.com to remove www)  
  2. RewriteCond %{HTTP_HOST} !^www.example.com$ [NC]  
  3. RewriteRule ^(.*)$ http://www.example.com/$1 [R=301,L]  
WordPress requires you to redirect all non-files and directories to index.php:
  1. RewriteCond %{REQUEST_FILENAME} !-f  
  2. RewriteCond %{REQUEST_FILENAME} !-d  
  3. RewriteRule . index.php [PT]  
Disable ETags:
  1. Header unset ETag  
  2. FileETag None  
Suppress PHP errors (note that this might not work on all hosts):
  1. php_flag display_startup_errors off  
  2. php_flag display_errors off  
  3. php_flag html_errors off  
  4. php_value docref_root 0  
  5. php_value docref_ext 0  
Control caching on files to speed up your site:
  1. ExpiresActive On  
  2. ExpiresDefault A0  
  3. "\.(gif|jpg|jpeg|png|swf)$">  
  4. # 2 weeks  
  5. ExpiresDefault A1209600  
  6. Header append Cache-Control "public"  
  7.   
  8. "\.(xml|txt|html)$">  
  9. # 2 hours  
  10. ExpiresDefault A7200  
  11. Header append Cache-Control "proxy-revalidate"  
  12.   
  13. "\.(js|css)$">  
  14. # 3 days  
  15. ExpiresDefault A259200  
  16. Header append Cache-Control "proxy-revalidate"  
  17.   
Secure the .htaccess file:
  1.   
  2.  Order Allow,Deny  
  3.  Deny from all  
  4.   
Secure the wp-config.php file:
  1.   
  2.  Order Deny,Allow  
  3.  Deny from all  
  4.   
Secure .svn directories, as explained in step #2:
  1. RewriteRule ^(.*/)?\.svn/ - [F,L]  
If you would like to add more configuration for your website and are looking for a general tutorial, consider Nettuts’ Ultimate Guide to htaccess Files or Stupid htaccess Tricks on Perishable Press.

Step 12: Use gzip

Gzip
Applying gzip can compress text files up to 80% and greatly save bandwidth. Making it active on your site only requires a PHP file and a bit of .htaccess. Note that the following code is referenced from a gzip tutorial on Lateral Code.

PHP (gzip.php):

  1.     if( isset( $_SERVER['HTTP_ACCEPT_ENCODING'] ) && substr_count( $_SERVER['HTTP_ACCEPT_ENCODING'], 'gzip' ) && !preg_match( '/(load-styles|load-scripts)\.php/'$_SERVER'SCRIPT_NAME' ] ) )  
  2.         ob_start( 'ob_gzhandler' );  
  3.     else  
  4.         ob_start();  
  5. ?>  
This may look a bit daunting at first, but it really isn’t too bad. The large boolean expression checks whether gzip is available and, if so, it’s applied. Unfortunately, I have found that this gzip method doesn’t function well with WordPress’ load-styles.php and load-scripts.php. As a result, the preg_match is used to exclude them.

.htaccess:

  1. "\.js$">  
  2. AddHandler application/x-httpd-php .js  
  3. php_value default_mimetype "text/javascript"  
  4.   
  5. "\.css$">  
  6. AddHandler application/x-httpd-php .css  
  7. php_value default_mimetype "text/css"  
  8.   
  9. "\.(htm|html|shtml)$">  
  10. AddHandler application/x-httpd-php .html  
  11. php_value default_mimetype "text/html"  
  12.   
  13. php_value auto_prepend_file /absolute/path/to/gzip.php  
This snippet adds the php handler to .html, .css, and .js files so that they can be gzipped. It also prepends the previously mentioned gzip.php file. Make sure to change /absolute/path/to/gzip.php to the correct path.

Step 13: Apply the 4G Blacklist

Perishable Press’ 4G Blacklist will prevent numerous attacks on your website through .htaccess. I’ve included the code below (edited for WordPress). You can learn about how it works by reading the article on Perishable Press:
  1. ### PERISHABLE PRESS 4G BLACKLIST ###  
  2.   
  3. # ESSENTIALS  
  4. RewriteEngine on  
  5. ServerSignature Off  
  6. Options All -Indexes  
  7. Options +FollowSymLinks  
  8.   
  9. # FILTER REQUEST METHODS  
  10. <IfModule mod_rewrite.c>  
  11.  RewriteCond %{REQUEST_METHOD} ^(TRACE|DELETE|TRACK) [NC]  
  12.  RewriteRule ^(.*)$ - [F,L]  
  13. IfModule>  
  14.   
  15. # BLACKLIST CANDIDATES  
  16. <Limit GET POST PUT>  
  17.  Order Allow,Deny  
  18.  Allow from all  
  19.  Deny from 75.126.85.215   "# blacklist candidate 2008-01-02 = admin-ajax.php attack "  
  20.  Deny from 128.111.48.138  "# blacklist candidate 2008-02-10 = cryptic character strings "  
  21.  Deny from 87.248.163.54   "# blacklist candidate 2008-03-09 = block administrative attacks "  
  22.  Deny from 84.122.143.99   "# blacklist candidate 2008-04-27 = block clam store loser "  
  23.  Deny from 210.210.119.145 "# blacklist candidate 2008-05-31 = block _vpi.xml attacks "  
  24.  Deny from 66.74.199.125   "# blacklist candidate 2008-10-19 = block mindless spider running "  
  25.  Deny from 203.55.231.100  "# 1048 attacks in 60 minutes"  
  26.  Deny from 24.19.202.10    "# 1629 attacks in 90 minutes"  
  27. Limit>  
  28.   
  29. # QUERY STRING EXPLOITS  
  30. <IfModule mod_rewrite.c>  
  31.  RewriteCond %{QUERY_STRING} \.\.\/    [NC,OR]  
  32.  RewriteCond %{QUERY_STRING} boot\.ini [NC,OR]  
  33.  RewriteCond %{QUERY_STRING} tag\=     [NC,OR]  
  34.  RewriteCond %{QUERY_STRING} ftp\:     [NC,OR]  
  35.  RewriteCond %{QUERY_STRING} http\:    [NC,OR]  
  36.  RewriteCond %{QUERY_STRING} https\:   [NC,OR]  
  37.  RewriteCond %{QUERY_STRING} mosConfig [NC,OR]  
  38. # RewriteCond %{QUERY_STRING} ^.*(\[|\]|\(|\)|<|>|'|"|;|\?|\*).* [NC,OR]  
  39. # RewriteCond %{QUERY_STRING} ^.*(%22|%27|%3C|%3E|%5C|%7B|%7C).* [NC,OR]  
  40.  RewriteCond %{QUERY_STRING} ^.*(%0|%A|%B|%C|%D|%E|%F|127\.0).* [NC,OR]  
  41.  RewriteCond %{QUERY_STRING} ^.*(globals|encode|localhost|loopback).* [NC,OR]  
  42.  RewriteCond %{QUERY_STRING} ^.*(request|select|insert|union|declare|drop).* [NC]  
  43.  RewriteRule ^(.*)$ - [F,L]  
  44. IfModule>  
  45.   
  46. # CHARACTER STRINGS  
  47. <IfModule mod_alias.c>  
  48.  # BASIC CHARACTERS  
  49.  RedirectMatch 403 \,  
  50.  RedirectMatch 403 \:  
  51.  RedirectMatch 403 \;  
  52. # RedirectMatch 403 \=  
  53.  RedirectMatch 403 \@  
  54.  RedirectMatch 403 \[  
  55.  RedirectMatch 403 \]  
  56.  RedirectMatch 403 \^  
  57.  RedirectMatch 403 \`  
  58.  RedirectMatch 403 \{  
  59.  RedirectMatch 403 \}  
  60.  RedirectMatch 403 \~  
  61.  RedirectMatch 403 \"  
  62.  RedirectMatch 403 \$  
  63.  RedirectMatch 403 \<  
  64.  RedirectMatch 403 \>  
  65.  RedirectMatch 403 \|  
  66.  RedirectMatch 403 \.\.  
  67. # RedirectMatch 403 \/\/  
  68.  RedirectMatch 403 \%0  
  69.  RedirectMatch 403 \%A  
  70.  RedirectMatch 403 \%B  
  71.  RedirectMatch 403 \%C  
  72.  RedirectMatch 403 \%D  
  73.  RedirectMatch 403 \%E  
  74.  RedirectMatch 403 \%F  
  75.  RedirectMatch 403 \%22  
  76.  RedirectMatch 403 \%27  
  77.  RedirectMatch 403 \%28  
  78.  RedirectMatch 403 \%29  
  79.  RedirectMatch 403 \%3C  
  80.  RedirectMatch 403 \%3E  
  81. # RedirectMatch 403 \%3F  
  82.  RedirectMatch 403 \%5B  
  83.  RedirectMatch 403 \%5C  
  84.  RedirectMatch 403 \%5D  
  85.  RedirectMatch 403 \%7B  
  86.  RedirectMatch 403 \%7C  
  87.  RedirectMatch 403 \%7D  
  88.  # COMMON PATTERNS  
  89.  Redirectmatch 403 \_vpi  
  90.  RedirectMatch 403 \.inc  
  91.  Redirectmatch 403 xAou6  
  92.  Redirectmatch 403 db\_name  
  93.  Redirectmatch 403 select\(  
  94.  Redirectmatch 403 convert\(  
  95.  Redirectmatch 403 \/query\/  
  96.  RedirectMatch 403 ImpEvData  
  97.  Redirectmatch 403 \.XMLHTTP  
  98.  Redirectmatch 403 proxydeny  
  99.  RedirectMatch 403 function\.  
  100.  Redirectmatch 403 remoteFile  
  101.  Redirectmatch 403 servername  
  102.  Redirectmatch 403 \&rptmode\=  
  103.  Redirectmatch 403 sys\_cpanel  
  104.  RedirectMatch 403 db\_connect  
  105.  RedirectMatch 403 doeditconfig  
  106.  RedirectMatch 403 check\_proxy  
  107.  Redirectmatch 403 system\_user  
  108.  Redirectmatch 403 \/\(null\)\/  
  109.  Redirectmatch 403 clientrequest  
  110.  Redirectmatch 403 option\_value  
  111.  RedirectMatch 403 ref\.outcontrol  
  112.  # SPECIFIC EXPLOITS  
  113.  RedirectMatch 403 errors\.  
  114. # RedirectMatch 403 config\.  
  115.  RedirectMatch 403 include\.  
  116.  RedirectMatch 403 display\.  
  117.  RedirectMatch 403 register\.  
  118.  Redirectmatch 403 password\.  
  119.  RedirectMatch 403 maincore\.  
  120.  RedirectMatch 403 authorize\.  
  121.  Redirectmatch 403 macromates\.  
  122.  RedirectMatch 403 head\_auth\.  
  123.  RedirectMatch 403 submit\_links\.  
  124.  RedirectMatch 403 change\_action\.  
  125.  Redirectmatch 403 com\_facileforms\/  
  126.  RedirectMatch 403 admin\_db\_utilities\.  
  127.  RedirectMatch 403 admin\.webring\.docs\.  
  128.  Redirectmatch 403 Table\/Latest\/index\.  
  129. IfModule>  
A few of these rules are commented out or edited because they interfere with WordPress. If you are having problems with certain URLs, fix them by prepending a “#” (comment) to the corresponding rule.

Step 14: Activate Akismet

“Activating Akismet is a must in order to prevent comment spam.”
Activating Akismet is a must in order to prevent comment spam. Do so by registering for an API key at akismet.com. Note that a WordPress.com account API key will also work.
Once you obtain a key, visit Plugins > Akismet Configuration in your dashboard and paste it in the corresponding box.

Step 15: Download Plugins

Plugins
The following plugins are a great help to any WordPress blog:
For further security, these plugins, referenced from DigWP’s WordPress lockdown article, are also important:
To make installation easy, you can run the following in command-line under your plugins directory:
  1. wget http://downloads.wordpress.org/plugin/all-in-one-seo-pack.zip  
  2. wget http://downloads.wordpress.org/plugin/google-sitemap-generator.3.2.4.zip  
  3. wget http://downloads.wordpress.org/plugin/wordpress-file-monitor.2.3.3.zip  
  4. wget http://downloads.wordpress.org/plugin/wp-security-scan.zip  
  5. wget http://downloads.wordpress.org/plugin/ultimate-security-check.1.2.zip  
  6. wget http://downloads.wordpress.org/plugin/secure-wordpress.zip  
  7. find . -name '*.zip' -exec unzip {} \;  
  8. rm *.zip  
This will retrieve zip files for the plugins, unzip them, and delete the .zips
These download links may not be correct later on due to plugin updates. As a result, you can visit the wordpress.org plugin pages listed above in order to find the updated links.
After you finish installing the plugins, make sure to enable them through the WordPress dashboard.

Step 16: Configure All in One SEO Pack

Before All in One SEO Pack becomes active, you’ll need to configure it. Go to Settings > All in One SEO to do so. Make sure to mark the “enabled” radio button. In addition, add in a home title, description, and keywords. Finally, set the rest of the options to your liking.

Step 17: Generate a Sitemap

Visit Settings > XML-Sitemap to generate your first sitemap that will be sent to search engines. Before doing so, ensure that the options on the page are what you desire. For example, I often edit the change frequencies, as my posts are modified quite often.
Once you are ready, scroll to the top of the page and click the build link (“Click here”). You might have to create two blank files—sitemap.xml and sitemap.xml.gz—in your root directory depending on the directory permissions. Nevertheless, once you finish building it for the first time, it should automatically update as long as you have “Rebuild sitemap if you change the content of your blog ” checked.

Step 18: Add Security

Security
At this point, you’ve already installed four security plugins. You should now put them into use.
Visit Settings > WordPress File Monitor and add wp-content/uploads in the exclude path. Change the other information if necessary. Note that this plugin will inform you whenever it notices a change in your file system.
Under Settings > Secure WP, check Error Messages and Windows Live Writer for extra protection.
Note that there is a new “Security” tab created by WP Security Scan. Fix items in red under Security > Security and Security > Scanner. When you visit Security > Scanner, make sure to chmod all of your individual plugins with 755 as well. Furthermore, you can use the password tool to generate a strong password.
Finally, fix the errors under Tools > Ultimate Security Check and ensure your site receives an A.

Step 19: Customize Theme and Sidebar

Now that you’ve setup a flexible, secure WordPress installation, you’ll need to make it comprehensive by customizing the theme and sidebar to fit your site’s needs. Of course, there is no set method to accomplish this; each site is unique in it’s own way. Make a theme that appeals to both you and your readers.

Step 20: Write Content

Write
All that’s left now is to write genuine content that appeals to your user base. You now have a flexible, secure, and comprehensive WordPress installation. Use it wisely.

Congratulations! You now have a flexible, secure, and comprehensive WordPress installation. Use it wisely!

The Icon Directory For Designers

Icons are necessary in web design to convey messages, create mental images, and to establish a visual connection between your content and your readers. Whether you are attempting to design your own icon, find the perfect set for your website, or implement the icons into your design successfully, finding the perfect resource can be a daunting task. Welcome to the complete Icon Directory For Designers.
This post is a complete directory of icons for Web designers. Featured are hundreds of icon sets that will be continually updated, dozens of icon design tutorials, as well as dozens of examples of successful uses of icons in web design.
Bookmark this page so you will always have a growing resource for icon information at your fingertips!

Simple PHP Ban IP Address Script

// IP to ban
$banned_ip = "1.2.3.4";

// user's IP is held in the $_SERVER variable
$user_ip = $_SERVER['REMOTE_ADDR'];

// check if user's IP matches banned IP
if($user_ip == $banned_ip) {
    echo "Access denied";
}

// multiple IP addresses?
$banned_ips = array("1.2.3.4", "4.3.2.1");

// check for match
foreach($banned_ips as $ip_ban) {
    if($user_ip == $ip_ban) {
        echo "Access denied";
    }
}

?>

Seo | Web Design | Web Development | Link Building | Web Maintenance | CMS | Shopping Feeds | E-commerce | Corporate Identity | Web Application Solutions | Web Programming | Web Marketing | Flash Design | Brochure Design | Content Writing | Ultimate Solution | Content Identity | Support | Outsourcing | Portfolio | Testimonials | SEO Plans | SEO Packages | Internet Marketing Strategy | Site Optimization & Maintenance | PPC Management Services | Web Design Company Chennai | Privacy Policy | Term of Service | Copyright


Ultimate Creators is an innovative web design Company Chennai Specializing in Web Designing, Logo Branding,Search Engine Marketing, Search Engine Promotion and Search Engine Ranking Services

Ultimate creators is the height of creativity when it comes to web designing, logo branding with a touche of excellence added to your product you can be assured of the ultimate creation in the World Wide Web. If you wish to market yourself in the web you can opt for the seo package which provides you with the options of search engine marketing, search engine promotion and search engine ranking services. For ultimate creations look no further than ultimate creators